KopiKetan BLOG Adobe Photoshop is a powerful photo editing software that lets you create, retouch, and remix your photos.
Vector Illustration In Photoshop – Although Photoshop is a raster graphics software, it has many tools and techniques for manipulating vector images. One of the best techniques is the ability to vectorize raster images.
This is a very useful trick that every artist and designer should learn. For example, if you have a logo or a low-resolution image that you want to scale without blurring it, you can vectorize the image in Photoshop to resize it to your liking.
Vector Illustration In Photoshop
In this quick guide, we’ll show you how to vectorize an image in Photoshop. It’s a very simple method, you see.
Simple Portrait Vector Art Photoshop Tutorial
Download thousands of great Photoshop actions and plugins with an Envato Elements subscription. It starts at $16 per month and gives you unlimited access to a growing library of 2,000,000 actions, presets, design templates, themes, photos and more.
Carbonium Black & White Photoshop Action Storm PS Photoshop Action Retro Vintage Action Film Photoshop Action Shatter Glass Action Photoshop Color Double Exposure Photoshop Action Double Exposure Photoshop Action
The main difference between vector and raster formats is that vector images are made up of paths, which makes them easier to scale and edit. But raster images are made up of pixels.
Resizing or scaling a raster image affects the quality of the image and can make it appear blurry or pixelated. In the case of vector images, you can scale them without affecting the quality.
Vector Illustration Photoshop Action, Add Ons
By vectorizing a raster image, you will be able to easily resize it without losing much of its quality.
This method is based on a very simple process of vectorizing simple images. Note that it works best with images such as logos, icons and shapes. It may not work well for complex and highly colorful images such as photographs.
Press Control + Alt + I on your keyboard to bring up the Image Size window and set the resolution to 300.
Then separate the image you want to vectorize from the background. Select and copy it to a new layer. Or remove the background.
Adobe Illustrator Photoshop Vector Art Icons And Graphics For Free Download, Illustrator, Photoshop, Art Icons Png And Vector With Transparent Background For Free Download
After separating the background image, click the layer icon in the Layers panel while holding down the Control key on your keyboard.
This will create an image selection. Now select the Selection tool from the tool palette (or press M), move the cursor over the selection and right-click.
Then select Create Vector Mask. This creates a vector mask on the layer that you see in the Layers panel.
All that remains now is to save the vectorized image as a vector file.
Vector Art Photoshop Action Bundle
Go to File >> Save As and then select Photoshop EPS file format from the Save As Type menu. Click the Save button to save the vectorized image.
You can now open an EPS file in Illustrator to easily scale your image without losing quality.
If you’re here to create vector graphics from an image like clip art, you can check out this YouTube tutorial. This is a more complex process that we cannot explain here.
There is another alternative. You can use Photoshop actions to convert images to vectors and draw them. Here are some options you can try.
Create A Character Illustration With Photoshop
This is a quick Photoshop action that uses a similar technique we used earlier to vectorize images. Other than using this action, you don’t have to work. It works with one click.
A very useful Photoshop function that not only creates vector graphics from images, but also converts them to a scalable vector file format.
This Photoshop action instantly converts images into vector graphics. Although it does not completely convert images to vector format.
This Photoshop action is similar to the previous one. It also creates a vector clipart look for your images.
Adobe Illustrator Photoshop Vector Art Icons And Graphics, Illustrator, Photoshop, Art Icons Png And Vector With Transparent Background For Free Download
A collection of 4 different vector graphics Photoshop actions. Includes actions for creating line drawings, halftone graphics, and vector graphics.
As a designer, you will discover many benefits of vectorizing your images. This simple trick will definitely make your job easier.
Photoshop Actions are a huge time saver that allows you to save time performing the same processing on multiple images. Using the work of others can help you use creative techniques, sophisticated post-processing styles and beautiful effects. In this series, you’ll learn how to use Photoshop actions and professional examples to use in your own design work. Vector graphics are really popular these days. Everyone creates vector graphics. It’s not difficult and you don’t need to know how to draw to create them. Be warned, however, that vector graphics take a lot of time and patience. Especially if you want to create unique art.
In this tutorial I will shed some light on creating vector graphics and more importantly how to create really good vector graphics using Adobe Photoshop. We create layers of shape vectors.
Click Magic Vector Art Cartoon Effect Free Photoshop Actions By Shazim Creations
To even start thinking about making this tutorial, you need to know how to use the Pen Tool. If you don’t know how to use the pen tool, follow this tutorial first (honestly, it’s not that hard).
Do not merge or rasterize shape layers. As long as all layers are shape layers, you have vector artwork… This means you can scale the original PSD file up and down in Photoshop and it will be perfect and pixel free! If the end result is not a vector file (it is a rasterized jpg, etc.), you must use Adobe Illustrator to create a vector file.
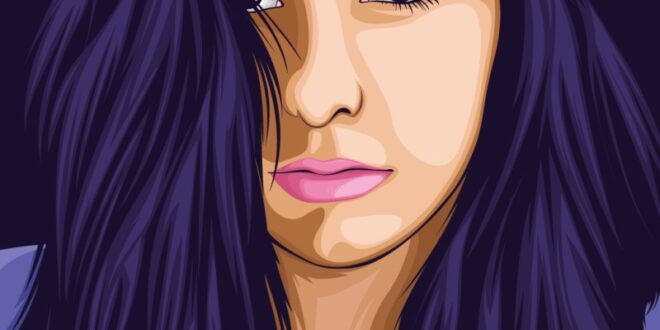
First you need to select the image you want to vectorize. Make sure you really like the photo you’re starting with. You will look at this image for hours and basically your vector image will resemble this photo. Many people create carriers of their favorite musicians and actors as a kind of tribute. I think this is a great idea because I think it motivates you to complete the task and do a good job. Be careful when choosing the image you want to vectorize… it should be a decent size so you can zoom in and see even more detail. Anything less than 600 x 600 pixels is not good. Larger when choosing which photo to convert to vector.
A poster layer can act as a rough guide when you get stuck. (Personally, I always find it a bit tricky and use a posterization layer to help me). Please do not use it to create vectors. If you do this, the resulting image will never be boring and without artistic value!
Vector Art Of My Friend Made With Photoshop 🤩
Enable “Background Children” visibility. That way you only see the path and the color doesn’t interfere.
Choose a medium skin tone. Grab the Pen tool, make sure it’s set to create shape layers (see image below). Outline the face, making sure to close the path.
After the shape layer is complete, I like to toggle the visibility of the top “duplicate background” layer on and off to compare the two layers. Your layers palette should look like the image below. Note that once I like to lock the layers.
Trace the outline of the hair. As a rule, the initial shade (base color) of the hair should be dark. Then you build layers of lighter and lighter colors/shades.
Vector Art Photoshop Tutorial :: Behance
Once you’re happy with the layer, fold it into a set called “hair” and pin it. I like to keep things organized, so instead of naming each new layer in the vector, I like to organize them into sets like “hair set”, “eyebrow set”, “sleeve set”, etc.
In the image below you can see that I have locked all the main shapes and sorted the layer palette.
This vector is a little unusual because her hair is completely black, so I used this layer to create completely black areas on the face.
There is no set order in which different tasks are created. I like to work on a certain area until it’s done and then move on. However, I always notice that I can improve when working in another area…
Girl Vector Portrait Tutorial Illustrator :: Behance
I used a total of 316 layers to create this Bjork vector, so I can’t show each layer step by step, but I made an animated clip of the layers. That’s 16 hours of work condensed into 1 minute… Don’t blink or you’ll lose a few layers. If the video below doesn’t work, click here (or come back tomorrow).
Below are descriptions of some specific areas along with some tips. I’ll start with the eyes because I always like to start with the eyes. They are definitely one of the most important areas.
You can see by comparison