KopiKetan BLOG Adobe Photoshop is a powerful photo editing software that lets you create, retouch, and remix your photos.
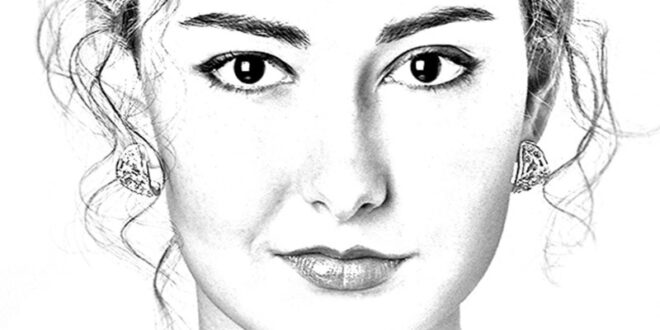
Photoshop Photo To Line Art Tutorial – How to draw a photo in Photoshop with a pencil; New and improved sketch effects Colin Smith
In the past I’ve done a Photoshop tutorial to turn a photo into a sketch, but over the years I’ve come up with a better way. See how to draw a photo pencil.
Photoshop Photo To Line Art Tutorial
We will create smooth shadings as well as lines that are characteristic of pencil drawing. I recommend watching the video first; Then you don’t have to remember everything, using the written steps as an easy reference.
Tablet Lineart Tutorial By Kuridoki On Deviantart
Step-by-step guide on how to draw a pencil drawing on your photo in Photoshop It works in all versions of Photoshop Step 1
Move the volume slider just enough to get a small but clean outline.
Now we have a good outline; But we want to add smooth shading (which other tutorials tend to stop at).
Change the blend mode to dark; You can apply blending modes to groups and individual layers.
Photo To Pencil Actions For Photoshop (sketch + Drawing Effects)
Select the top layer group and add a layer mask; But wait we want an inverted mask (hidden everything).
Hold Alt/Option while clicking the New Layer Mask icon in the Layers panel; You will now have a black mask.
With the mask selected, paint over the image and add any shadows you need. This is a fun picture to color.
A/ Select all layers and press Ctrl + Alt + Shift + E (Windows) Cmd + Option + Shift + E (Mac) and create a new compound layer on top.
How To Turn A Photo Into Comic Book Art In Adobe Photoshop
Don’t forget to check out our other tutorials here (use the search bar above, or search categories).
62 Responses to “How to Draw a Pencil Sketch on a Photo in Photoshop, New and Improved Sketch Effects”
Cut a person out of a photo and place it somewhere else; Match the tone and color and add a shadow. That’s…
New Photoshop 2020 Features: Save an object in a photo and add a realistic shadow using the new advanced… Sometimes I wonder how I’m going to render my images digitally. (I’ve always drawn by hand and my art is created with imaging software.) This will be a quick tutorial on using Photoshop to clean up a photo and publish it to social media and/or websites.
Converting A Photo To Line Art With Procreate
I’m not an imaging software expert; But I did a little trial and error with it, so I hope my advice helps. I’m sure there are many other ways to achieve the same result, but this works for me. Feel free to post any tips and tricks in the comments section.
While I will be using Photoshop for this tutorial, I’m sure there are many similar programs that can be used for the same purpose.
I often get questions about the tools I use for my images; So let’s start with my favorite drawing pad, the Rhodia Dot Pad. The texture of the paper is smooth and I love it. Although the method of using ink marker dots is subtle, I find them very useful for my art form.
Other brands like Pigma Micron and Uni Pen are good pens, but so are Copic’s Multiliners.
Easy Lineart Tutorial By Howxu On Deviantart
I used the iPhone 8 to take pictures, daylight, Always try to take photos near windows and with other light sources in the room (just turn off all the lights). As you can see from the images below, daylight will make a huge difference (in this tutorial I’ll be working with an “unlit” image that I can clean up to show you).
I photographed a Space Marine drop pod attack from the Warhammer 40,000 universe.
After customizing the image, Go to Image > Adjustments > Layers (or just press Command + L on a Mac).
Select the Black Droplet Tool and click on the shiny black you see on your image. This will darken all the art evenly and hide unwanted transitions like brushes.
Twisted Sketch Drawing Photoshop Action
Select the white spot tool and click on a dark white color in your image. This will make grays and yellows equally white.
Click on the background layer and drag to the “Create New Layer” button at the bottom of the Layers panel to create a new layer (or press Command+A, Command+C, Command+V) and fill. The background layer is white
Use the Polygonal Lasso Tool (L) to select a large white area in the image and press Delete to remove the point. Then use the eraser tool to remove the remaining dots that are hard to get to with the lasso.
I’ve tried a few other methods to get rid of the dots, For example by adjusting the blending options on the layer; However, in my experience; This compromises image detail. So I like to do it this way, even if it takes a little time. Put a good album on Spotify and get to work.
Design And Create Beautiful Vector Images Using Adobe Illustrator Draw
Remove all dots and continue flattening the image when you’re happy. I like to convert the image from RGB to grayscale to make sure I remove the color information in the image. (to reduce file size, )
My text doesn’t really match the pattern, so I added some text to the banner in this image. Also added gray to the wings in the background.
Finally resize the image and save it as a PNG file (to reduce compression and quality).
I hope you enjoyed this tutorial and found it helpful. Good luck and keep drawing! pictures, Be sure to follow me on Instagram where more maps and tips are posted at https://www.instagram.com/paths.peculiar/