KopiKetan BLOG Adobe Photoshop is a powerful photo editing software that lets you create, retouch, and remix your photos.
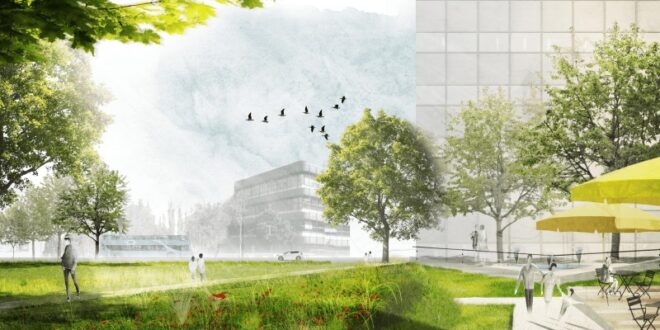
Architectural Rendering In Photoshop – The sight of buildings should evoke emotions so it is important enough to create the right conditions in giving! In general, many versions show a clear spring weather with clear blue skies and perfect green trees. But sometimes you want to stand out or show an architectural design in a different mood. In that case, water conditions may be an option! That’s why we want to show you in this tutorial how to make a raindrop in Photoshop based on a standard cloud rendering.
Creating a wet environment for your scene can be difficult, and it takes a lot of time and experience to get a good result (ie in 3dsmax-vray). mood with the help of Photoshop in creating a post.
Architectural Rendering In Photoshop
We try to explain the technology in detail so that you can apply it to any activity you work with. I want to use the version that is created for the client. The original scene of the photo is usually seen at dawn.
I Will 2d Renders Plan, Section, And Elevation On Photoshop
First, we start to change the color of the image, we will give a dark area. The reason for this is that, usually when we have a lot of water, we don’t have as much light as it happened, as we can see in the first picture. So we go to Filter > Camera Raw (Ctrl + Shift + A) and set the settings as shown below. The value of the adjustment, in general, depends on the activity you are using. Anyway, here are the fixes I made:
Second, to create contrast in the image, and darken or lighten some parts of the image, we choose the Dodge and Burn tools. The brush settings used in the tool are:
Thirdly, to shape the image in the right way, I use a sharpener, to sharpen the edges that I see if necessary, to make the area better for the rain. The Sharp tool settings used are:
Next, we want to add some lighting to another area. Always according to the dark outside created when it rains. Therefore, we open a new window (CTRL + SHIFT + N), select the brush tool, choose a color similar to the light you have and adjust the size, hardness and opacity according to your experience. These are the settings used to distribute light from a light post:
Happy 25th Birthday Photoshop; Architecture Wouldn’t Be The Same Without You
The next step is to add the reflection created by the rain on the surface of the earth. The easiest and fastest way to create a preview is to select the part of the image that you want to see below. In this case, we must choose a white building, a lamp post and a car in each street, according to the angle that will be considered. To select a part of the image, in this case we use the Lasso Tool. I chose the location shown in the image below:
After the selection is made, we copy it to another layer by pressing CRL + J. Then, we need to press (Ctrl + T) to change the selection, and press Vertical Flip. Insert the reversed part of the image, where you think it might happen. In this case, this is the location:
We want to continue in the same way, selecting other parts of the image, such as cars, trees, lights, etc. Repeat the process carefully, rotating the selection vertically and placing it in the correct position. At the end of the process, it can look scary and ugly. Don’t go back, we are already in the process of releasing the results.
To make the scene look more dramatic, we want to go to Filter > Blur > Motion Blur. Then we apply these adjustments to all parts of the displayed image. We set the process as follows:
How To Create Shadows In Photoshop For Architectural Visualization
This is how it should look after applying Filter to all selected cells.
After that, select all the shaded layers, hold down Ctrl and click on another layer, press CTL + G, to create a Group so that we don’t have a complicated situation with cells.
In addition, we want to smooth the edges of the displayed layer. To do this, we select the device to delete and set:
The size of the eraser can be adjusted depending on the area you want to erase. Play with this tool. In the end you should get something similar to the image below
Rendering An Architectural Night Scene In V Ray And Photoshop
So that the shadows match the whole image. We change the blend mode of all groups with a projection. We click on Blending Options and select Hard Light and reduce the opacity to 46%. Opacity can be adjusted depending on the scene you are using.
Now we want to add an image of water over all the layers. This will be the most important part of the picture. We’re using a rain texture overlaid on an image with a black background, but to fit the whole scene, you’ll need to change the blend mode. That way only the white part of the image (the water drops) will be combined with your original building scene.
Well – get some black/white raindrop shapes if you want (or make your own) and add them to the area. Next scale or change the water drop to fit your Photoshop base image. Then I changed the blending mode to Screen and set the layer opacity to 36%. Again, the opacity can be adjusted according to your experience.
I also want to add some fog to the ground because the area can look really good with this additional feature. Imagine this rainy situation… Well, some mist visible on the ground can bring a real perspective, right? Well, we’re using the same method we used to increase rainfall. So first we need to model the fog structure. You can use this if you want:
How To Achieve Grainy Looking Renders?
Did you know that? I just took a picture of part of the cloud, reduced the saturation and played with the level – boom there you are. Use if you like and add to your experience. Then again: adjust the Blending Mode, but this time Color Dodge and Opacity to 67%. We put a fog layer under the rain.
Now we want to add some fog to some areas of the scene. You can use the same original image, but maybe change it with a soft black brush. Then set the Blending Mode to Light and we set the Opacity to 54%.
We right-click on the layer, and click Rasterize Layer, to allow us to edit the image. So with the eraser tool we remove the edges of the foggy image. We try to use a brush type with an opacity of 50-70 and a low hardness value. The size of the Erases tool depends on your experience and depends on the part you want to erase. Now we copy the layer and play with the fog. We must be careful to add mist every time we see if it is necessary to make the area look like a rainstorm.
Yes we delete the “Comment” layer 🙂 Now we start to manipulate with the first image. We chose the Dodge tool.
Post Production Tutorials To Dramatically Improve Your Renders
The size does not need to be adjusted in this way, it can be changed depending on the event taking place. We play around with the Dodge tool, especially on the floor, as we want to give a bright glow where the water still sits. We also use a sharp sharpening tool on the original image, in order to sharpen the edges and increase the brightness that the scene should have.
To make the show more visible above ground. We copy the “Building reflection” layer. In this section, we can remove some layers that are considered as complete shadows in the area.
Now for the final touches, we want to lower the exposure and saturation values of the original image. So, we press CTL + H, and reduce the value as follows:
Now we need to darken the bottom of the image with the gradient tool. We chose the color black for the front. In the gradient palette (top left) we select the second option, which only selects the foreground color. Then we draw a line as shown below, to create a black line at the bottom of the image.
Architectural Rendering Workshop
Because