 KopiKetan BLOG Adobe Photoshop is a powerful photo editing software that lets you create, retouch, and remix your photos.
Photoshop Dispersion Brush Tutorial – To view this video, please enable JavaScript and upgrade to a web browser that supports HTML5 video.
Follow a step-by-step guide to one of Photoshop’s most popular special effects as we create a photorealistic dispersion effect from scratch.
Photoshop Dispersion Brush Tutorial
Best of all, we’ve included 7 custom Photoshop brushes that you can use to create your own splatter, particle, and splash effects on your photos.
Dispersion Effect In Photoshop Cs6
Master one of Photoshop’s most popular special effects. Follow the included sample image and 6 custom brushes to learn how to create your own dispersion effect from scratch.
Special effects are a great way to tell a story in a picture. Whether you’re looking for some Photoshop fun or need a dynamic new look for your professional work, we’ll walk you through the process of creating a realistic splash effect.
To create this effect, we photographed rocks and dirt thrown into the sky, then turned those images into unique feature brushes. Combining photographic details and textures with control over Photoshop brush settings, these custom brushes create beautiful particle effects with subtle, natural variations.
Special effects are fun, but can be difficult to get right. Not only will we show you how to create one of the most popular effects, but we’ll also show you how to capture it using a technique that makes it look like it was all caught on camera.
Image Dispersion Effect Online Maker (april 2022)
Learn how to use layer effects like Bevel and Emboss to add shape and dimension. Create realistic highlight and shadow detail to help diffuse particles appear to be painted in the same scene as the subject. Then learn more about layer effects in How to Master Layer Styles in Photoshop.
Learn how to use light and color to add realistic depth and dimension to special effects in Photoshop. We’ll show you a powerful technique that allows you to analyze the lighting and color of a scene and then apply the same scene to the element you’re painting.
When you’re finalizing an effect or a composite image, using noise and grain can help bring all the different elements together into a single, seamless image. Learn how to use noise and grain properly for the best photorealistic effect.
You don’t need 50 different images and a bunch of complicated tools and assets to create amazing special effects in Photoshop. Learn how to take just one photo and create your own special effect brushes to make your fantasy come true.
Wireframe Photoshop Action
We break down professional techniques to help you create ultra-realistic effects in Photoshop. Adding effects to your Photoshop skills can serve as inspiration for new ideas and help you become more versatile when doing custom jobs for clients.
Dispersion effects are great for any scene where you want to emphasize movement, emotion or energy. Pay close attention to the position and movement of our subject and see how we applied our splash effect. Then take your storytelling skills to the next level with the Levitation Beginner’s Guide
We’ve developed these brushes to work with a wide variety of special effects. Download our brushes and add them to your creative toolbox, then try our PRO tutorial to learn more about the incredible power of the Brush tool in Photoshop.
Not only will we include 6 custom Photoshop brushes, but we’ll walk you through the process of creating them from scratch. So the next time you need a specific brush or texture style, you’ll know how to do it yourself.
Dispersion Brushes For Ps Photoshop , Photoshop Brushes For Your Art Work
After completing the tutorial, try creating a splash effect on one of your photos. Use your new collection of detailed custom brushes and great new Photoshop skills to create your own unique effects.
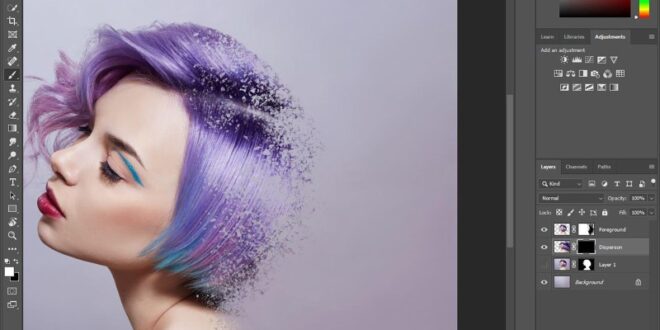
Aaron Nace is a photographer, Photoshop artist and founder. He is the #1 Photoshop teacher in the world with millions of YouTube subscribers. Creating a dispersion effect is a very easy, fun (and, I might add, very impressive) way to add impact to your artwork. This technique is very popular in Photoshop. In today’s tutorial I will explain how you can create a dispersion effect on joints using special brushes.
The first step is to separate the model from the background. (Actually, this step is not necessary here, since the background is simple and monochromatic, and we can skip it altogether. However, the step is necessary when the background is complex, so I will show the whole process.)
I take the free selection tool as shown above and trace the outline as closely as possible. When I’m done, I click copy and paste. This will copy the selection (= model) to another layer as you can see below.
Baponcreationz: Jackdaw Dispersion Effect Photoshop
Then go back to the bottom layer (the layer that contains both the model and the background) and delete the model. (It’s pretty easy here, I’m just coloring in black above. But usually more complex backgrounds require more effort, but… Hope you get the idea.)
Anyway, now I have two separate layers, one with just the model and one with just the background. Duplicate the model layer and add a mask to the top layer.
As you can see, the mask is white by default. What I want to do is take the splatter brush and paint the edges of my model black on the mask layer.
Here’s a quick note about layer masks. Using a mask has the advantage that anything you do (on the mask) will not damage the image below. You can paint the mask (I won’t go into detail here, the white color in the layer mask makes the layer visible, and the black color in the layer mask basically “disappears” the layer) and the image below remains the same. . , makes it easier to fix if something goes wrong, etc.
Dispersion Effect: Photoshop Tutorial — Steemit
Then go back to the first model layer and add a layer mask here as well. This time fill the mask with black.
I’ll deselect all layers to make them invisible except the bottom model layer. I work on the model, essentially “pushing” the entire image in the direction of the splash. In our case, it is external. So first I use the outline tool and draw out the model.
To exaggerate and fix some of the contrast, I’ll drag around my image using the blur tool. I will stop when it looks like this.
I’ll make all layers visible again and switch to a black layer mask. I’ll paint on the layer mask with a dispersion brush and white, and we’ll create particles in the direction of the intended dispersion. After all, I have something like that.
Dispersion Effect Tutorial
That’s it. I love this technique, it instantly creates a stunning effect and adds a wow factor. I hope you enjoyed this tutorial, stay tuned for the next one.
3d model 3d sculpture 3d sculpture apple pencil apple pencil art Arrtx brushes coloring pencils coloring pages design digital art digital image sculptor redraw this faber castell faber castel polyhomos fonts frozen gal gadot graphite graphite ipad how to draw pro sculpture jack ipad sparrow johnny depp kids crafts Nomad Sculptor pencil drawing photorealism pirates of the caribbean polychrome Prismacolor brush making realism review tutorial typography WonderWoman
I worked for a few months, and when I came back, Nomad Sculpt was like a completely different application.
Welcome to another installment of my “do it again” series. This time it was “broken again” and it was over
Create A Pixelated Dispersion Effect In Photoshop
Learning a new program (especially 3d) can be intimidating, trust me, I know. When I started 3D


