 KopiKetan BLOG Adobe Photoshop is a powerful photo editing software that lets you create, retouch, and remix your photos.
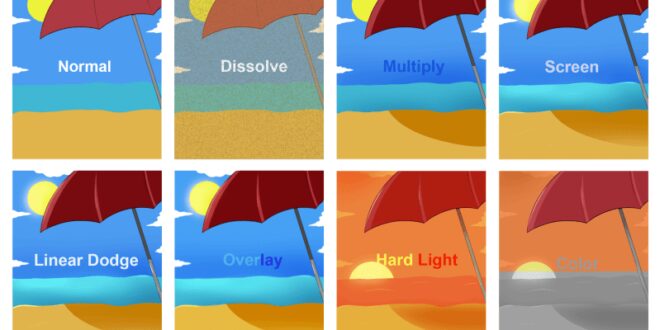
Photoshop Blend Modes For Graphic Designers – From levels of color to complex shapes, mixing techniques help us combine groups in powerful ways. Learn how to create a simple blended image and add stylish colors as you explore each blending technique in Photoshop.
Today is the 15th day of our 30 Days Photoshop series. If you liked it, stay tuned for all 30 episodes where we will explore the magic of Photoshop together!
Photoshop Blend Modes For Graphic Designers
Sign up to receive email updates to get you started, sample images to follow, and a printable calendar to keep track of your progress!
How To Use Photoshop Layer Blend Modes For Amazing Effects
Blending techniques are a quick way to blend two layers based on elements like color, contrast, and brightness. In our example, there is a bright picture of a goldfish on a black background and a picture of a dark place at night. We want to create a surreal composite image that creates the illusion of a goldfish floating in the sky over land. Luckily, integration methods make this easy!
Just set the goldfish’s blending mode to a light mode like Light or Screen; all black pixels in that layer will disappear. This leaves us with a relatively clean goldfish in the landscape.
Although we were able to remove the black surface of the goldfish, stars can still be seen underneath the goldfish. This is because top light mode tells Photoshop to take the lightest pixels from the top layer and use them in the bottom layer. However, if the pixels at the bottom are brighter than the pixels at the top (in this case, stars), those pixels will still be visible. You can fix this in a variety of ways, but we recommend creating a new empty layer between the two layers you’re trying to merge, then using the Brush tool to paint over any bright pixels that don’t need to be visible in black.
Tidying methods can help us get organized a lot, but they don’t stop there. They also make the color grading process super quick and easy! Blending modes allow you to use tools like Gradient Maps, Brush Tool, and even solid color fills to paint our photos. Add any color element as a new layer and change the blending mode to see what effect it has. You can achieve even more precise results by adjusting the opacity or using Blend If to apply colors only to highlights, midtones, or shadows. Photoshop is a powerful image editing tool and has many features that will make your photos stand out. Integration methods determine how a particular layer is connected to the layers below it without damaging it. In this quick tutorial, we’ll show you how to use blending modes and learn what they do in Photoshop.
How To Use Adobe Photoshop
Blending methods look at color data on one side and tell pixels how to interact with other elements, drawing tools, or editing tools. You can use blending modes to create unique effects on your images with just one click. There are 27 different matching options to choose from. Photoshop divides them into 6 small groups for easy navigation. Normal, Dark, Light, Contrast, Contrast and Color. These groups are not marked in the program but are separated by horizontal lines.
To use the blending method, you must first select the layer you want to touch. You can then hover over any mode from the Blend Mode drop-down menu to see a preview of what each will look like. To verify and use your integration method, be sure to click on the name of the method in the list and voila! In the example above, I used the Hue blending method, which affects the color of the layer so that the red apple turns into a green apple.
Blending techniques can be used to give many different looks and styles to a photo. Blending techniques should be used carefully as using too much at once can create a look that is too bold. We often use variations like Multiply to apply gradients of a single color to an image to help text stand out and remain visible in the photo. Brightness also transforms the photo from full color to monochrome. Each blending mode will behave differently depending on the photo and colors you use. Experiment and see what works best for you and your project.
If you want to continue receiving more tech tips designed specifically for marketers in professional services firms using Adobe software, subscribe to our blog or follow us on social media.
Compositing And Blending In Css
Josephine holds an associate’s degree in Computer Science/Graphic Design from Middlesex Community College and is currently working on her bachelor’s degree at Southern New Hampshire University. She enjoys video games, watching movies, drawing, cooking, sewing, photography, paper crafting, and spending time with her two French bulldogs.
We use cookies on our website to give you a relevant experience by remembering your preferences and frequent visits. By clicking “Accept” you consent to the use of ALL cookies. However, you can visit the cookie settings to provide controlled access. Cookie settings ACCEPT
This website uses cookies to improve your experience while you navigate through the website. Out of these cookies, the cookies that are classified as necessary are stored on your browser as they are essential for the working of basic functionalities of the website. We also use third-party cookies that help us analyze and understand how you use this website. These cookies will be stored in your browser only with your consent. You also have the option to disable these cookies. However, disabling some of these cookies may affect your browsing experience.
Necessary cookies are required for the website to function properly. This category only includes cookies that ensure the functionality and security of the website. These cookies do not store your information.
The 8 Special Blending Modes In Photoshop
Analytical cookies are used to understand how visitors interact with the website. These cookies include information such as number of visitors, bounce rate, traffic source, etc. It helps provide information about metrics such as.
Performance cookies are used to understand and analyze important website performance data to help provide visitors with a better experience.
Performance cookies help perform certain tasks, such as sharing website content on social media platforms, collecting feedback and other third-party tasks.
Marketing cookies are used to deliver relevant advertising and marketing campaigns to visitors. These cookies track website visitors and collect information to deliver customized ads. Most photographers know that layers are one of the most popular features of Photoshop. Layers are the foundation of non-destructive editing in Photoshop, and almost all Photoshop tasks involve layers. Therefore, it is important to understand how these elements can be combined with each other using Photoshop’s blending methods.
Photoshop Blending Modes Explained: A Practical Guide For Artists And Designers
This article will provide you with a basic understanding of integration and guide you through effective integration techniques. If you’re new to Photoshop, check out my Adobe Photoshop Beginner’s Guide article before you get started.
In Photoshop, blending modes are options found in the Layers tab. They explain how a particular layer fits together with the layers beneath it. Check out the picture below:
As you can see in the screenshot above, Photoshop has 27 blending modes in 6 groups. The names of the groups already give you an idea of what they do. Although there are only 27 of these, most of us will only find a few useful in most situations. There are a number of integration methods that I haven’t used or seen anyone else use, and this article covers just a few of the integrations that I’ve found useful.
Before we get into specific blending modes, you should understand the other two tools available in Photoshop in a single panel: Opacity and Fill. Check out the picture below:
All Blending Modes Explained
There are three superimposed copies of the same image. The opacity of any layer can be changed using the opacity drop-down menu (marked in red in the image above).
The difference between the three glasses is obvious. The middle one is 100% opaque; in other words, it blocks everything underneath. The image on the left is 50% opaque, meaning it has a transparent appearance. Shows both the selected layer and the layer merged below it. Compare the one on the left with the one on the right. A 20% opaque layer shows 80% of the background and 20% of the selected layer.
Opacity is often used in photography to reduce the effects of a particular layer. The demo above explained how opacity works in theory. Now let me show you how this can be put to good use. Check out the picture below:
As you can see, I used a simple curve adjustment layer to add contrast. But you will


