 KopiKetan BLOG Adobe Photoshop is a powerful photo editing software that lets you create, retouch, and remix your photos.
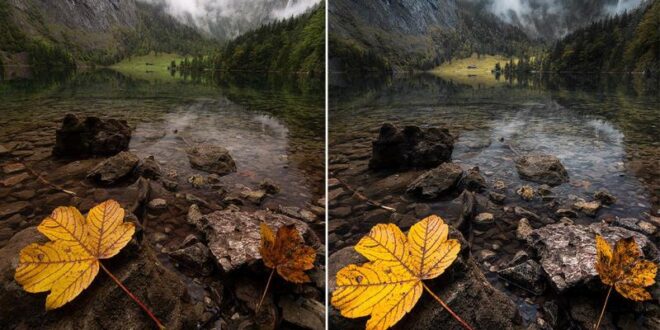
Landscape Photography Editing In Photoshop – Adobe Camera RAW, built on top of Photoshop and Lightroom, is a powerful tool that allows us to edit RAW files. From white balance and exposure to lens correction and creative effects, it’s a full-featured set of options that can take your photos to the next level. Check out everything Adobe Camera RAW has to offer as we show you how to edit and enhance your landscape photos!
This is day 29 of our 30 Days of Photoshop series. Stay tuned for 30 episodes as we explore the magic of Photoshop together!
Landscape Photography Editing In Photoshop
Sign up to receive email updates to keep working, sample images to follow, and a printable calendar to track your progress!
How To Create A Scenic Landscape Photo Manipulation With Adobe Photoshop
Adobe Camera RAW is Adobe’s answer to RAW processing in Photoshop and Lightroom. With it, you can access all the information in your RAW images to adjust exposure, color correction, correct lens distortion, and more. When you open a RAW file with Photoshop, Adobe Camera RAW opens and allows you to make any changes you want before loading it as a layer in Photoshop.
Once you’ve finished all the initial editing, be sure to load the RAW image into Photoshop as a 16-bit image in Adobe RGB 1998 and as a Smart Object. These settings will ensure that you’re always working with the most information when editing, and you can always return to Adobe Camera RAW to make further changes.
Global adjustments are any changes you make that affect the entire image. So, if you open an image in ACR, increase the exposure slider slightly, and the exposure of the entire image will increase. Comprehensive editing is great for fixing common issues like lighting, color, and lens distortion or chromatic aberration.
Local editing makes things more fun. Using tools such as radial or gradient filters or adjustment brushes, you can select specific parts of the image to apply an adjustment. So, if you want to bring out more detail in an overexposed sky, you can use an adjustment brush to paint the sky, and then make the necessary changes to the exposure. This change will only affect the selected area, in this case the sky, and the rest of the image will remain unchanged. Local adjustments are an important part of the editing process, because they allow you to choose the exact look you really want, and help guide the viewer’s eye to distinguish different parts of the image.
Recovering A Landscape Photo In Lightroom
When working with landscape images, it is important that the image has a balanced exposure from bright sky to dark ground. Unless you’re photographing after dark, it’s easy for the sun to steal the spotlight and draw too much attention to the sky and clouds. Using a combination of filters and an adjustment brush, you can reduce the exposure of the sky, while leaving dark areas of the ground unaffected. If you are shooting late in the evening, you may need to increase the exposure of the sky to recover some of the detail in the clouds.
Next, you want to make sure that the highlights, midtones, and shadows have detail. Darkening the sky a little will usually help restore some highlight detail, but you’ll also need to overexpose in some areas of the land and landscape. This will help restore some of the natural textures and details that may appear a little dark and muddy when viewed from the camera.
Finally, try enhancing the natural colors and details in the image with color grading and sharpening. Nature is very good at giving us beautiful palettes to work with, all we have to do as editors is make sure the colors look as vibrant as they do in real life. Once the colors are set, the best way to guide the viewer’s eye through the most important elements of the image is to finish the image with some detail clarity. Shows more detail in the sky, enhances lighting, and adds stunning definition with bokeh and burn! Learn how to add more impact to your landscape photos with powerful tools in Adobe Camera RAW and Photoshop.
If you love working with landscapes, you’ll love our masterclass on Luminosity Masking and creating HDR manually. These two techniques are perfect for taking your landscape photos to the next level.
Landscape Photography Tips For Beginners Brendan Williams Creative
Adobe Camera RAW is Adobe’s answer to RAW processing in Photoshop and Lightroom. With it, you can access all the information in your RAW images to adjust exposure, color correction, correct lens distortion, and more.
When you open a RAW file with Photoshop, Adobe Camera RAW opens and allows you to make any changes you want before loading it as a layer in Photoshop.
Make sure to select the Open image as Smart Object option, as this allows you to return to Adobe Camera RAW at any time to make any changes you want.
Before learning about Adobe Camera RAW, it’s important to understand the difference between global editing and local editing.
Nature Photography Editing Tips To Create Stunning Images In Seconds
Global adjustments are any changes you make that affect the entire image. So, if you open an image in ACR, increase the exposure slider slightly, and the exposure of the entire image will increase. Comprehensive editing is great for fixing common issues like lighting, color, and lens distortion or chromatic aberration.
Local editing makes things more fun. Using tools such as radial or gradient filters or adjustment brushes, you can select specific parts of the image to apply an adjustment. So, if you want to bring out more detail in an overexposed sky, you can use an adjustment brush to paint the sky, and then make the necessary changes to the exposure. This change will only affect the selected area, in this case the sky, and the rest of the image will remain unchanged. Local adjustments are an important part of the editing process, because they allow you to choose the exact look you really want, and help guide the viewer’s eye to distinguish different parts of the image.
There’s a reason landscape photos are everywhere. Whether it’s the virtual desktop wallpaper that came with your computer, or the Ansel Adams poster on your high school classroom wall, they play an important role in sharing beautiful places, times, and ideas with the world.
As photographers and editors, there are many important steps we can take to make sure the landscape photos our cameras capture are as powerful as what our eyes see when we’re there.
Is This Real Landscape Photography?
First, it is important that the light is balanced, from bright sky to dark ground. Unless you’re photographing after dark, it’s easy for the sun to steal the spotlight and draw too much attention to the sky and clouds. Using a combination of filters and an adjustment brush, you can reduce the exposure of the sky, without affecting the darker areas of the ground. If you are shooting late in the evening, you may need to increase the exposure of the sky to recover some of the detail in the clouds.
Next, you want to make sure that the highlights, midtones, and shadows have detail. Darkening the sky a little will usually help restore some highlight detail, but you’ll also need to overexpose in some areas of the land and landscape. This will help restore some of the natural textures and details that may appear a little dark and muddy when viewed from the camera.
Finally, try enhancing the natural colors and details in the image with color grading and sharpening. Nature is very good at providing us with beautiful palettes to work with, all we have to do as editors is make the colors look as amazing as they do in real life. Once colors are set, it’s a great way to guide the viewer’s eye through the most important elements of the image. Product code: 0003 Category: Landscape photo editing, photo editing, Photoshop, video courses Tags: Adobe, Photoshop, post processing, sales, video courses
Did you take a great photo but want to improve it by editing it? Want to learn how to edit landscape photos in Adobe Photoshop? Benjamin Jaworskyj teaches you everything you need to know to edit landscape images in Adobe Photoshop. In the first part of the video course, you learned all the basics of image processing:
Adobe Photoshop Elements 2021 Adds New Portrait Features And Moving Photos
In the second part of the video course, Ben explains more complex landscape photo editing techniques.
Ben also demonstrates his complete workflow for editing landscape images in Adobe Photoshop on different images taken in Norway.
“This is a great video course


