 KopiKetan BLOG Adobe Photoshop is a powerful photo editing software that lets you create, retouch, and remix your photos.
Cinemagraph Creation In Photoshop – Cinemagraphs are fun and whimsical images that show an element of action. Take a few video files and load them into Photoshop; still image creation; It then achieves this by hiding selected areas to reveal the movements behind them. Then when you save the file as a GIF, You have a movie image. If you want to learn the basics of video recording with a DSLR or mirrorless camera, Watch the first part of this tutorial – Shooting Video for Movies – by clicking here.
If you have a copy of Photoshop CC; It has everything you need to make a movie. You can buy special software for this, but it’s expensive, and creating it in Photoshop is quick and easy if you know how. At best, The customization tools available are just as powerful as editing images.
Cinemagraph Creation In Photoshop
Creating a cinematic image requires proper video equipment. Click here to learn more about video recording for motion pictures.
Animated Gif Image
This website provides its services; Google uses cookies to personalize ads and analyze traffic. Information about your use of this website is sent to Google. By using this website, you accept the use of cookies. Accept Reject Read more
This website uses cookies to improve your user experience when you browse this website. Among them, Cookies are classified as necessary because they are stored in your browser in order to perform the basic functions of the website. We also use third-party cookies that help us analyze and understand how you use this website. These cookies are stored in your browser only with your consent. You also have the option to decline these cookies. However, Declining some of these cookies may affect your browsing experience.
Cookies are absolutely necessary for the proper functioning of the website. This category only includes cookies to ensure basic functionality and security features of the website. These cookies do not store personal information.
Analyzing users’ personal data that is not specifically required for website operation; All cookies used specifically to collect users’ personal information through advertisements or other embedded content are called non-necessary cookies. It is mandatory to obtain user consent before using these cookies on your website. Advertisers are always looking for the next big medium to engage their audience. First there are the pictures. Then the captivating dynamics of the videos become essential. But what if you could have the best of both worlds? A format that combines the motion of video with the usability of still images.
Cinemagraph: How To Plan, Shoot & Edit (step By Step Guide)
A movie image is a GIF loop where only part of the image moves. But a little more. Filmmakers are looking for an image that has enough visual impact to stand on its own. Movement only adds to the picture. No need to pay attention. As the name suggests, It should have impressive features like in the movie.
The process is surprisingly simple. If you are filming yourself; I want a stable screenshot that creates a nice, smooth loop. If not, You need to find the appropriate video for the loop.
With over 6 million new videos in the library, There are many options and choose a loop video. swirling clouds, Waterfalls or a record player are great ways to practice.
When you import your video into Photoshop; The Timeline function will open at the bottom. Otherwise, you can open it yourself from Window > Timeline.
Creating Captivating And Magical Cinemagraphs In Photoshop
You can easily copy your videos by dragging and dropping your video group to the Create New Layer option in the lower right corner. You should now have two identical videos on two different lines in your “timeline”.
Duplicate the video by dragging and dropping a layer onto the Create New Layer icon in the lower right corner.
It doesn’t matter where you want the ring to start as long as there is tape in front. After a while you’ll see why. After choosing where to start the chain, Trim both videos to start at the same point.
Now we have to decide where the end point is. Once you’ve selected it, use the time dial to highlight it. Now you can trim the end of your first video; Only then will it end up where you choose. Leave the second video layer for now.
How To Create A Cinemagraph In Photoshop
Be aware of the length of your movie. Best of all, It should be as short as possible and not take forever to load.
This is where the beginning of the loop takes shape. After you’ve edited your first video well, you need to edit your second video so that the GIF looks smooth.
Drag your second video so that it starts where the first one ends. Then we want to recover the parts of the video that we cut before starting (so you need to have some space in your video before the loop starts). You don’t need to bring everything back; It’s enough that you can smoothly transition from the first video to the next.
Once that is done, The end of the second video can now end at the same time as the first video. Here we duplicate the last frame of the second video with the first frame of the first video and create a loop.
Animate Photos: Create A Cinemagraph In Photoshop
At the moment, This is the top tier, so only the first video is visible. So I want to use the timestamp and exposure setting to move from one video to another.
There is no specific rule about when the transition starts. Play around until you find something that matches the video. In this 4 second example, I started the transition after 2 seconds.
The second timestamp should be at the end of the video. Then make sure the first time stamp is 100% opacity and the second time stamp is 0% opacity.
You should now have your loop properties. But if you’re not happy with that, keep playing where the transition starts.
How To Create A Cinemagraph A Step By Step Guide
Move from the first video layer to the second layer to change the transparency as the video progresses.
Because it’s a looped GIF, It should be viewed in this format. Create a loop play by clicking the gear icon to the left of your videos and enabling the Loop Play option.
In some cases, the process ends here because there is no other motion in the video that you need to clean up. If so, Proceed to step 10 to export.
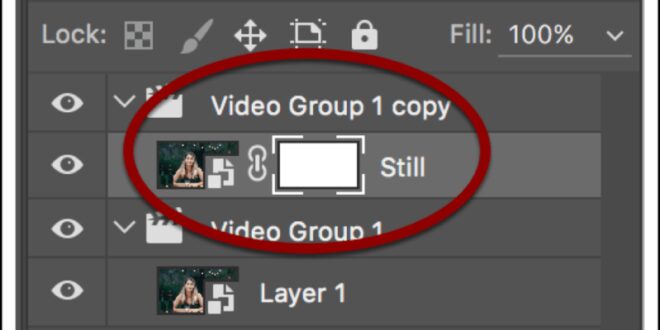
If you want to hide the rest of the motion in the video, You must first select the image you want to use as a still for your movie.
Create A Neon Glow Effect In Photoshop
Once you’ve made your selection, Select it with the timeline marker. You can then link this frame as a new layer.
Then you need to create a layer mask for it in the lower right corner. With the layer mask selected (the white square around it), paint only the areas you want the video to turn black.
Check your layer mask to see if any adjustments need to be made. But when you are satisfied, We can export it as a GIF.
Use the Save to Web (Legacy) option to export your movie. In the dialog, Set the spread and colors to 256. Other settings should normally be fine. If you want to reduce your file size, we recommend reducing the dimensions.
Kinemaphoto: A Photoshop Extension To Develop Cinemagraphs Quickly By Jose Antunes
These export settings provide the highest quality movies, but the dimensions are reduced to 50% to make them look faster. The size has changed from over 25 megabytes to under 7 megabytes. Significant improvement in file size
That’s it! Your movie footage must be complete and viewable as a continuous GIF. It’s amazing what they do. Once you finish your first project, you’ll want to do many more.
They are visually appealing and easy to incorporate into your content. Cinemagraphs offers a new way to delight and amaze your audience with these engaging images.
Matt started out as a live music photographer photographing bands in Brighton and has been fascinated by the power of images ever since. She loves storytelling and her job is to find unique images in the library and tell the story behind them. Pamily, You are truly delightful. In today’s episode, I’m going to show you how to create a movie image in Photoshop. Not only that, He also gives tips on how to make movies with the camera. sit down, Grab some popcorn and go for a ride
Adding Life To Your Brand With Cinemagraphs And Gifs
Cinematic images are usually created by taking a series of photos or video recording and combining images using image processing software.


