 KopiKetan BLOG Adobe Photoshop is a powerful photo editing software that lets you create, retouch, and remix your photos.
Artistic Photo Filters In Photoshop – Digital Darkroom is a series of posts designed for beginners and those interested in digital photography and editing. In previous weeks, we’ve covered basic adjustments, curves, color editing with the HSL/Color panels, black and white tint, split tone, local adjustments, sharpening, noise reduction and lens correction, and camera calibration in Lightroom and Adobe Camera Raw. . Moving on to Photoshop, we covered the program layout, basic lighting settings, basic color settings, basic black and white settings, basic sharpening, basic noise reduction, creating styles and actions, basic masks, creating selections, refining selections, using the pen tool. , Clone Stamp , Heal Tool, Patch Tool, Content Aware, Smart Objects, Basic Blur Filter, Field Blur, Iris Blur, Tilt Shift Blur, Path Blur, Spin Blur and this week Art Filters.
So far in our Digital Photo Lab series, we’ve looked at filters and adjustments to get the most out of your photos. Although sometimes we don’t want to adjust the image and save it as a photo, but turn it into something else. This is where the line between photography and digital art can sometimes be drawn. I don’t think there’s anything wrong with making a painting a fake watercolor as long as it suits the subject. But I wouldn’t call it photography anymore. Although that is a discussion I will probably write about later.
Artistic Photo Filters In Photoshop
This week’s post on The Digital Darkroom looks at artistic filters in Photoshop. Like all filters in Photoshop, these filters are quite powerful. However, I think this is more than a one-click solution, although others may disagree.
Best Comic Book Style Photoshop Actions (+ Pop Art Actions)
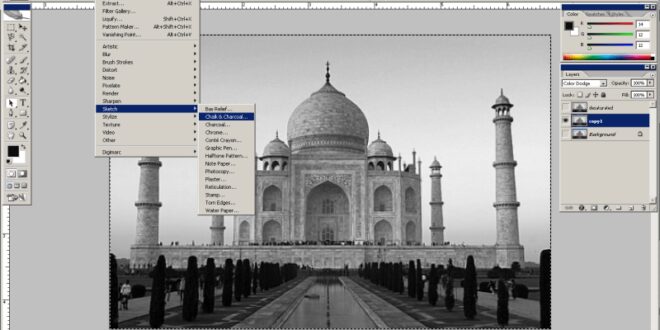
Art filters are sometimes hidden in Photoshop, especially after CS6, and finding them can be frustrating at first. Photoshop hides them in the filter gallery with some other filters, but they can also be accessed via the filter menu.
To access art filters through the filter menu, you must first go to Editing Options and then Extensions. Here you choose
Now there you have it, we can use filters to recreate different artistic techniques to customize your image.
This filter hatches the image to create a pencil effect. Areas of similar tones are shaded with diagonal lines and areas of contrast are outlined.
The Digital Darkroom; Artistic Filters Photoshop
Edge smoothness – how much edge detail is preserved between contrasting areas. The lower the value, the more rounded and curved the edges are.
This filter can be used to add a more stylish effect to an image by reducing detail with strokes. It can also be used to imitate watercolors or oil paintings.
Brush size – the size of the brush. With a larger brush, the effect looks like a watercolor, while with a smaller brush, the effect can be more like an oil painting.
Brush details – controls the amount of details. It is usually best to increase this setting as the brush size increases for best effect.
Steps To Editing Fine Art Black And White Photography In Photoshop Cc
It’s not exactly an artistic method, but it does a good job of adding realistic grain to the image. Grain is mainly added to the darker parts of the image, making the lighter areas richer and brighter.
Creates an effect similar to pigment applied to fresh plaster. The image blurs and, like a dry brush, can well imitate watercolor and oil painting.
Neon Glow reduces the color saturation of an image by adding primary colors to the background. He then uses a third color to create a glow in the shadows.
Glow Size – controls the intensity of the glow. This filter works with positive and negative scaling. If the image is dark and the background is light, you need to use the negative side of the scale and visually.
Gimp Chat • Is There An Equivalent To The Photoshop ‘cutout’ Filter ?
This filter obviously makes it look like something is wrapped in plastic, but can also give an image a wet look or feel.
Smoothness – controls how smooth the plastic structure is. A higher value means more bright areas on the surface.
Gives a rough feel to the poster by reducing the number of colors and adding a black outline between the contrast areas. Similar to Cutout, but with black lines and smoother.
In the atyisic Filter menu, you can combine filters to create a single effect. On the right sidebar, next to the button, click the new filter button below next to the cart to add a new filter. These filters are then layered and applied to each filter below. You can also change the order of the filters by dragging them up and down.
How To Easily Make A Photocopy Effect In Photoshop — Medialoot
You can also use layers in Photoshop to blend different filters. This is a method I like to use because I can mix filter effects with layer masks and blending options. Using the image above, I duplicated the image layer and applied on the neon glow filters, one per layer.
If you have any questions or comments, please use the comments section below, as this series is designed to help people learn Photoshop and Lightroom.
If you would like to be notified when I post on my blog, you can follow me on Twitter@apertureF64, Facebook.com/aperturesixtyfour, or alternatively receive email notifications by subscribing below. All images copyright Benjamin Rowe, ALL RIGHTS reserved unless owned by another photographer. Please read my copyright policy for more information. When you think of filters in photography, your first thought might be the special pieces of glass that you attach to the end of the lens. Most of these filters are designed for a specific purpose (such as a polarizing filter to reduce glare), although some are designed for artistic effects (such as color filters).
However, if you want to apply artistic/special effects in post-processing, Photoshop has several filters that you can use at this stage of the workflow. They can also be used to clean up or retouch images.
Neural Filters List And Faq
When working with an image, it is desirable to work non-destructively (that is, not change pixels). Applying Photoshop filters directly to the pixel layer
A smart filter is a filter applied to a smart object, a layer that preserves the original image information with its original properties and enables damage-free editing. So, before you start applying filters, convert the layer you’re working on to a smart object.
Note. Depending on your version of Photoshop, you may not be able to use some filters as smart filters.
Photoshop’s filter gallery gives you quick access to a range of filters. From the menu, select Filters and then Filter Gallery to display them on screen. This is an easy way to see the effect the filter will have without changing the original image. Here you can use one or a combination of filters on your image.
Create Dream Like Images In Photoshop
The easiest way to understand what they do is to select each one and see a preview. This is a simple artistic edit that can be useful if used selectively.
This is also available in the Filter menu and can be useful for correcting distortions caused by wide-angle or fisheye lenses. These lenses sometimes create curves that weren’t really there. You can also use an adaptive wide-angle filter to straighten lines that look crooked in panoramas.
To straighten a curved horizon, click and drag from the left side of the horizon to the right. This adds a blue line (called bound) around the item area. A border delimits an area and straightens it.
The lens correction filter corrects various types of distortions. Similar to an adaptive wide-angle filter, it removes distortion caused by wide-angle and fisheye lenses. It can also straighten photos taken at an angle and make them look like they were taken straight on. One of the great things about this filter is that you can fix the image manually or let Photoshop fix it automatically.
How To Create A Watercolor Effect In Photoshop (easily)
The Liquify filter can be used to move pixels and is one of the most powerful filters in the Filter menu. You might associate floating with body transformation, but it can do so much more.
In the liquid filter menu, the most popular tool is direct warp (top left). The key to using this tool successfully is to use a slightly larger brush than you think you need. You should also use a brush with less pressure (for more subtlety) and increase the density (to affect a larger area within the circle of the brush).
The Vanishing Point filter brings the image into line with another’s perspective. For example, if you want to integrate a picture frame into a room, this filter will help you match the perspective of the frame to any wall at the right angle.
This can help you get the most out of your photos or be super creative. Many simplify the steps Photoshop can perform, so you can do them in less time. Some of them include Nik Collection, Topaz and ON1.
Photoshop Filters Collections For Photographers In 2024
Using Photoshop filters is an easy option if you want to get creative. Photoshop has several default settings that you can experiment with, and combining them can create a unique image.
Is it. chick and project manager with a passion for


