KopiKetan BLOG Adobe Photoshop is a powerful photo editing software that lets you create, retouch, and remix your photos.
Professional Photo Borders In Photoshop – If you want to add a border or border to any image, you can do so in Photoshop. Although you have hundreds of designs at your fingertips, we’ve provided a tutorial that will show you how to create a border in Photoshop.
From the Layers panel, click the close icon to open the layer containing your image, which can be edited.
Professional Photo Borders In Photoshop
Go to Image > Canvas Size and add the amount of pixels that will appear outside of your image.
Clipping Mask Fills The Borders Of The Shape Photoshop
Choose Layer > New Fill Layer > Solid Color and set the color to something that complements your image.
If you’re not happy with the border color you’ve chosen, you can change the color in the Layers panel by double-clicking it.
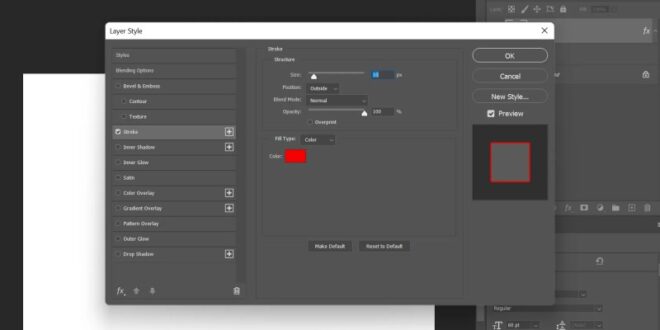
In this tutorial, we’ll add a second border for even more customization! Click the fx icon in the Layers panel and select Stroke.
Adjust the width of the stroke by playing with the slider in the dialog box or enter the number of pixels. Then click the color box to change the color.
How To Make The Out Of Bounds, Pop Out Effect In Photoshop Tutorial
When you’re happy with the border, add information by creating a new text layer. In this tutorial, we typed Happy Holidays and set the font to Boucherie Sans Bold, which is available from Adobe Fonts or sold directly from type designer Laura Worthington.
Thank you for taking the time to participate in one of our courses. Did you know you can do this border? It specializes in borders and frames, making it the best software for creating such designs. Check out the tutorial and learn how to quickly create a custom border. Learn how to add a simple image border, or even a double border, around your photos in Photoshop! Step-by-step tutorials for Photoshop CC, CS6 and earlier.
Photo borders are a great way to add class and a sense of beauty to photos. Adding a border is easy once you know the steps. We’ll start by adding more space around the image using Photoshop’s Canvas Size command. Next, we’ll fill the space with color using a solid color fill layer to create a border. You’ll learn how to choose a border color from the color picker and how to match the border to your image by choosing a color directly from the image itself!
After adding a border to the main image, I’ll show you how to add a second, smaller border around the image using a layer effect.
Histogram In Photoshop: Exposure Analysis
Here is the image border around the image. You’ll learn how to adjust the border size and color by following these steps:
For this tutorial I’m using Photoshop CC, but any recent version of Photoshop will work. You can also watch my video tutorials on my YouTube channel. Or download this tutorial as a printable PDF!
To create a border for the image, we add more canvas space around the image. So let’s give ourselves more room to work by taking action. To exit the keyboard, press the Ctrl key on a Windows PC or the Command key and the Minus key on a Mac. This gives us more room to see the border:
We need to open the background layer so we can add other layers below it. To unlock it, click the lock icon in Photoshop CC. In CS6 or earlier, double-click the Alt (Win) / Option (Mac) key on your keyboard. This removes the lock icon and changes the layer to “Layer 0”:
White Balance Cannot Be Set
To add more canvas space around the image, go to the Image menu in the menu bar and select Canvas Size:
Make sure the relevant option is selected in the Canvas Size dialog box. Next, make sure Center Square is selected in the Anchor Grid. This adds a new horizontal canvas space around the image:
Then enter the desired size for your image’s border in the Width and Height fields. Note that the value you enter is split equally between the two sides. The same goes for width and height. So if you want a quarter-inch border for your image, you’ll want to enter 0.5 inches for the width and height. For a 1 inch border you should enter 2 inches. By the way, how big should you be?
In my case, I want a half-inch border, so I set the width and height to twice that number, or 1 inch:
How To Create A Professional Web Layout In Photoshop
Then, click OK to close the dialog box to increase the space. Here we see the new Kanai next to the picture. The checkerboard pattern means that the space is filled with transparency, but we’ll add the next color:
If you’ve selected the wrong size for your border, you can go to the Edit menu and uncheck Canvas Size. Then reopen the Canvas Size dialog (go to Image > Canvas Size) and try again:
To fill the border with color, we’ll use one of Photoshop’s solid color fill layers. Click the “New Fill or Adjustment Layer” icon at the bottom of the Layers panel:
In the color picker, select the desired color for the border. I’ll choose white for now, but I’ll show you how to change the color in a moment:
How To Easily Add A Detailed Border To Your Fantasy Maps — Map Effects
After closing the color picker, click OK. Photoshop fills the entire file in no time and prevents the image from appearing:
If you want something other than white, you can choose another color for the border by double-clicking the Column Color column:
You can select this color picker again. As you try different colors, you’ll see a live preview of the new color next to the image. So if I choose black instead of white:
You can choose any color from the color picker. Or you can choose the color directly from the image. Move the cursor over the image and click the desired color. In the background window I choose light gray:
Create A Vintage Film Effect In Photoshop (psd Template Included)
Again, the border will immediately change to the new color. Click OK to accept this and turn on the color picker:
Now that we’ve added the main border, let’s add a second, smaller border inside the main border. And we do it using layered effects.
In the Layer Style dialog box, leave Stroke Color for now and make sure Spacing is set. Then drag the Size slider to increase the width of the stroke:
As you drag, you’ll see the stroke size inside the large border:
Marquee Tool In Photoshop: Quick Selections
If you don’t want black as the stroke color, you can change the color by clicking on the clock:
Then, select another color in the color picker. Or you can choose a color directly from your image, as we did for the main border. Click on the background color:
The stroke will instantly update to the new color. When you’re happy with the color, click OK to close the color picker:
Finally, I complete the effect by adjusting the thickness of the stroke using the Size slider. I’m using a large image here, so I’m going with a value of around 32px. Next, I click OK to accept this and close the Layer Style dialog box:
How To Outline Text Or Add Borders To Text In Adobe Photoshop
There we are! How easy it is to add borders around your photos in Photoshop! For more photo border effects, check out my Shading Photo Borders and Photo Frames tutorial, as well as my tutorial on how to create a painted border. Or visit my Photo Effects section for more tutorials! Don’t forget that all of our tutorials are available for download as PDFs! Want to add frames or borders to your photos using Photoshop? In this article, I’ll show you a simple, step-by-step process for creating shapes in Photoshop. I’ll also show you how to add a complex border.
After completing this tutorial, you will be able to create frames and borders as shown above
In this section, I’ll show you how to create a simple white frame around your photos. Then I’ll explain how to create more detailed and interesting effects.
A white frame gives photos an elegant feel. This is also useful if you want to print the image and avoid it interfering with the border of the rug or frame.
The Ultimate Guide On How To Add A Border In Photoshop
Adjust the height and width units to percentages (rounded) This allows you to create a balanced shape without doing a lot of calculations.
Next, figure out how big you want your frame to be (as a percentage of the original). For this example, I wanted to create a frame that was 10% the size of my image, so I added 10% to the width and height values.
Secure the anchor