KopiKetan BLOG Adobe Photoshop is a powerful photo editing software that lets you create, retouch, and remix your photos.
Professional Color Correction In Photoshop – All Online Courses Beginners Lightroom Photoshop Fine Art Landscape Macros Wildlife Pros Landscape Astrophotography Long Exposure Cities at Night Fine Art Portrait Studio Lighting Headshots Portrait Retouching for Schools
So is Lightroom better at color grading? Especially when compared to more professional color standards in Photoshop. In this tutorial, you’ll learn how to shoot in color using Lightroom, and we’ll match this technique by doing it in Photoshop.
Professional Color Correction In Photoshop
Let’s learn Lightroom’s color grading panel and see how different the quality of the same image is in Photoshop. The results are amazing!
Color Grading Photoshop, Premiere & Davinci Resolve
Get access to all our online courses – 1000’s of videos, worksheets, member work reviews, personal support and more with our monthly membership.
Color grading in photography is the process of changing or enhancing the colors of an image. It is used in photography and filmmaking to change the mood or enhance the emotion the photographer is trying to portray. It is used to make the image more aesthetic by selecting a compatible color scheme and applying it to your image.
In our example, we are using a common complementary color scheme using orange and blue. This is sometimes called the orange and blue appearance. As you can see in the image below, blue has been added to the shadows and orange to the highlights to help match the colors already in the image. It is very pleasing to the eye.
Source image straight from the camera – Camera settings: F 2.8 – 1/400. Second – ISO 100 – 85mm focal length
How To Setup Color Preference In Adobe Photoshop Color Settings
Lightroom has added a special color grading panel to help you add color to your photos. You will see 3 color wheels on the panel to indicate your highlights, midtones and shadows. These dials can be used to enhance highlights, midtones and shadows respectively.
Color saturation can be controlled by clicking and holding from or to the center of the color wheel. To change the shade, move the dot around the wheel to the desired color.
Once you’ve selected your original colors, you can use the Blending slider to adjust the amount of overlap between shadows and highlights, and the Balance slider to balance the effects of highlights, midtones, and shadows. For example add more color to the highlights and less to the shadows or vice versa. There’s also a glow slider, which can lighten or darken the effect.
The best way to paint in Lightroom is to think about the color scheme you want to achieve before you start. The inspiration for this usually comes from the colors already in the image. Then think about colors that match those colors and look for colors that conflict with them.
How To Color Grade In Premiere Pro
For example, if your photo is of a sunset and orange light is streaming into your scene, orange is a good color to create your color scheme. Once you understand this, think about which colors harmonize or complement this color and which colors may clash.
In the example below, orange light hits the top of the mountain, so I used Lightroom’s Color Standards panel to add orange to the highlights and midtones and red to the shadows. This brought the colors of the film together and gave it a more harmonious feel.
Mount Teide, Tenerife – raw image, no color – camera settings: F 11 – 1/13 second – ISO 100 – 35mm focal length
You don’t need to limit yourself to Lightroom’s color grading panel, and you shouldn’t. Lightroom has many tools to help you categorize an image. As already mentioned, it’s not just about adding color. You should also remove colors that conflict with your scheme. In the Mount Teide example above, greens started to show in the lower right of the image during processing. To remove them, I used an HSL panel and completed the greens.
Colour Grade Your Footage In Adobe Premiere Pro Cc
I used the presence sliders to increase the blues pulse and saturation throughout the image. Below are screenshots of the exact settings used to colorize this image.
In the video above, I compare the color of the same image graded in Lightroom and Photoshop, so here’s my verdict.
Lightroom’s color grading panel is good, very good, and I think a lot of people will find it useful. I think this shows up more in landscape photography than portraits, as landscapes require less adjustment. It is very easy to use!
But that brings me to another discovery: Lightroom’s color grading lacks improvements. It lacks the fine details you can add when you do it in Photoshop. Photoshop gives you the ability to apply more specific colors throughout the scene and hide these effects with fine detail if needed. By the way, color grading in Photoshop is very complicated.
Color Grading Photoshop Actions To Enhance Your Photos
So, if you want a quick, easy and somewhat efficient color grading method, Lightroom will do the job perfectly. If you want a more professional, sophisticated look, especially for portrait photography, Photoshop is the place to go.
Portrait image color evaluated in Lightroom – Camera settings: F 2.8 – 1/400. Second – ISO 100 – 85mm focal length
Source image of Canary Wharf, London – Camera settings: F 16 – 3.2 seconds – ISO 100 – 16mm focal length
I hope you enjoyed this color grading tutorial, if you did leave us a comment and share it with your friends to support us and subscribe to our newsletter at the bottom of this page.
Color Grading And Correction With Capture One Pro
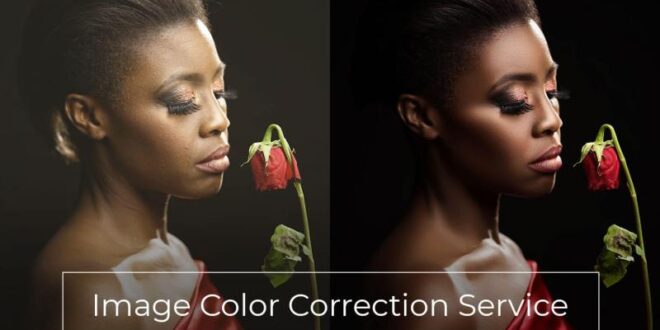
Hi, I’m Mark Newton, I’m a photographer, educational speaker, author, photography teacher and founder of The School of Photography. Follow my personal work on Facebook , Instagram , and Vero . Product photography has never been more important than it is now. So there is always a demand for photography markets. As you know, color correction in Photoshop can easily make your original images more attractive. Enhanced photos enhance the aesthetic appeal of product features. Here everyone can easily download Adobe Photoshop cs6 for free. You can get more information about this software by reading the blog. It takes less than 5 minutes!
However, to make money with photo editing, you need to have the right data. Portrait photography can benefit from image editing because it usually allows for a more personal image. It is important to promote e-commerce products online. For email business, you can make your website look professional by hiring some Photoshop color correction experts.
So, color correction may seem like a daunting task, but it’s not. Knowing how to adjust color balance in Photoshop will help you create perfect images. Read on to learn and use some alternatives to take your photography to the next level. Learning is fun! Good luck!!
The main purpose of image color correction software is to remove unwanted colors from photos. Because there are few color options, the word “unnecessary” is necessary. For example, you don’t want to neutralize a tanned face. Here you can remove the blue tint effect that sometimes appears in photos taken on cloudy days or in foggy locations. You can bring out the true colors of objects and objects in the photo and make the photo “POP” by removing the unwanted color effect.
Amazon.com: Dan Margulis: Books, Biography, Latest Update
Instead, it’s better not to focus on adjusting skin tone in Photoshop for each image, because the content dictates how you edit it. Most of the time, you’ll want to leave the shadow alone. Understanding the curve tool and the statistics surrounding it will help you determine what each frame needs.
E-Commerce or Product? Photography is the deciding factor in buying any product. Most customers rely on images to buy a product.
Restoring the color of the original image is called color correction. When taking a picture with a camera, we cannot always capture the image that our eyes see. Color correction in Photoshop helps restore the original color of the image.
When shooting outdoors you often don’t control the light. Light conditions generally vary during the day. If you shoot for long periods of time, it’s almost inevitable that the color tone of your photos won’t be the same throughout the day. To maintain consistency, you need to change the color in Photoshop.
Photoshop 2021: Color Grading In Camera Raw
Basic color correction and color grading methods aim to correct the color of an image. However, they differ in some respects.
Basically, color correction is a process of “correcting” the color of any image to restore the original color of the image. We can’t always capture the color we feel when we shoot. In this situation, we may need to manipulate the color to restore the original shade of the object.
In contrast, color grading is all about appearance. You can change the color tone of the image to get a new essence. It’s not exactly the same as the original, but it gives the film a more artistic feel