KopiKetan BLOG Adobe Photoshop is a powerful photo editing software that lets you create, retouch, and remix your photos.
Photoshop Double Exposure Tutorial – Double exposure involves combining two images into one image. On larger films, the shutter effect is created by exposing the same film twice to create double images. A process that requires skill, imagination and luck. Today, this can be done in camera (with a DSLR) as well as using photo editors.
During the pandemic, it is not always possible to go out and take pictures. So, digitally combining two images in the editor is a faster, more creative and fun way to create double exposure images with endless possibilities.
Photoshop Double Exposure Tutorial
The only tool you need here is a good photo editor. I am using an older version of Adobe Photoshop CS6. You can use free photo editors like Gimp or Pixlr.
Easy Double Exposure Photoshop Tutorial Effect
I have made this tutorial as simple as possible for beginners, using simple pictures to work with. Once you get it, the only limiting thing will be your mind!
Choose a group photo that has a clean color with a neutral tone, without many obstacles such as buildings, trees, cars, lights, etc. It should have high contrast and clean edges. This makes it easier to select a wash mask and surround the photo.
Antique can be what you want to cover. The most common are buildings, forests (especially pine trees), clouds and mountains.
Open the background image in Photoshop. If necessary, you can make adjustments to increase the contrast, sharpen the edges, and destabilize the photo to make it easier to work with.
Double Exposure Effect
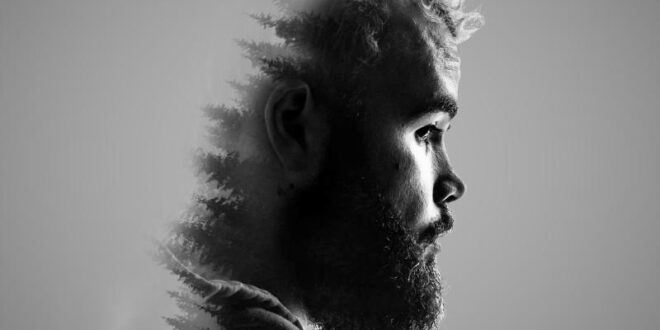
The image I used is a simple silhouette of a man to make it easy for everyone to learn.
After opening the image, create a duplicate layer (Ctrl/Cmd + J) and hide this duplicate layer. We will return to this layer later.
To open another image, go to File > Place and select the image. Now place the image next to your options.
I used my usual picture of me sitting by the river. Then I took another picture of the river, dropped it and masked it for the sky. With a little more detailed editing, the above image was the result!
How To Make A Double Exposure Photo In Photoshop
If you have any concerns or questions, please feel free to ask. I can help as much as I can. I hope you enjoy this tutorial and I’d love to see the double photo versions!
How to knit comfortable warm clothes for winter | Free knitting pattern from FernMakes at Knitting & Crochet. I used the steps to create the double exposure image you see above and I hope it helps you create your own. First of all, I used images from Pexels and Unsplash for the purposes of this tutorial and the links to them are here if you want to try and follow along. Although I encourage you to use it for yourself or others for a different effect.
I’m using GIMP for this tutorial because that’s what I use. I’m sure users of photo or other software can follow along, but we won’t show you where the settings are for each tool in the photo gallery. These are pretty simple as I’m sure you’ll find them.
Let’s start with this photo. For this effect to work properly, ideally you want another image on a flat white area. You can shoot this way using a white card or crop ball to make it white.
How To Easily Create Double Exposure Effect In Photoshop
Here you can see that the whole subject is not white after all. It’s easy to fill out, choose both sides and color or fill in black and white. You have to do it.
In this case, I roll the floor to outline the trees behind the model. You can make it as you think best. Experiment with edges. Move as needed, but make sure to stay on the photo model. As we mentioned in a previous video on creating a double exposure image in Photoshop by Aaron Ness: “In the analog era, double exposure was done using film with a camera, taking two different images on the same film, and what was creating a film known as the ‘double effect.’ “In the digital age and using Photoshop, we have the ability to do the same thing, but with more control.”
In this video, Pinsky goes a little deeper into how to actually combine two images into one piece of art using selection techniques, layer markers, adjustment layers, and more.
We’ve already covered how to create a double exposure using Adobe Photoshop in the past (in a more basic tutorial), and you can also follow a quick tutorial on double exposure on your digital camera.
Double Exposure Effect In Photoshop Tutorial (video)
You can check out more about Pinsky’s case here, as well as many other related tutorials in the Photoshop section.
Addo Genut is its author and editor-in-chief. He has been a technology reporter in international publications since the late 1990s, and has been a photographer since 2009. I am also the founder of a production company that specializes in visual content marketing for food and products.
This website uses cookies to improve your experience. We’ll fix you up with it, but feel free to opt out. I accept cookie settings
This website uses cookies to improve your experience while browsing the site. Of these cookies, cookies that are generally necessary are stored in your browser because they are necessary for the basic functions of the site to work. We also use third-party cookies to help us analyze and understand how you use this website. These cookies are only stored in your browser with your consent. You also have the option to disable these cookies. However, some of these cookies may be rejected to affect your browsing experience.
Double Exposure Made Easy With Adobe Photoshop
Cookies are absolutely necessary for the site to function properly. This group only includes cookies that control basic functionality and security features. These cookies do not store any personal information.
All cookies that are not strictly necessary for the website to function and are used in particular to collect personal user data through analytics, advertisements and other incoming content are called non-necessary cookies. It is recommended to obtain user consent before using these cookies on your site. When we are working with photo editing and looking for creative ways to show our vision, one of the ways to do this is to use double exposure in Photoshop. There is a huge library of photo tools that make this photo editing technique easy. When you look at pictures using the double exposure effect, it can look quite intimidating and you may wonder how to create such an artistic display.
However, this blog will provide you with steps you can follow to create a double exposure in Photoshop in no time and start creating your artistic visions. It’s more manageable than it looks. So sit back and relax and read this blog to master this art photography. Let’s first start by understanding what double exposure is and then proceed to create it.
Double exposure, in simple terms, means taking two images and often gives this surreal effect that you can use in different ways to present your vision. To get that otherworldly feel in your photos, you can do this while taking your photos with a camera and film. For a film camera, take your photo; you take another picture without moving the film. It doubles the exposure of two impressive images.
Double Exposure Effect Photoshop Tutorial
However, to gain creative control over your double image, Photoshop can be a much more enjoyable way to achieve the results you expect from your images. This process is made easier by the various image manipulation techniques and tools at your disposal. Therefore, we will focus on how Photoshop can help us achieve surrealism in our images.
Starting with this technique, we start by finding two images that we want to link from a royalty free site like Unsplash or Pexels. It is always important to see what you want to display in duplicate and choose images accordingly.
However, it is always recommended to use gap-free images without interference from other objects. The material should define the edges against the opposite objects so that we can easily select it to cover another image.
Then to the second image you gold the image within the image; You can use images with buildings, trees, forests, clouds, mountains, the choice all depends on the vision you want to portray with double exposure. For this double exposure tutorial, we’ll use a picture of a pine forest.
How To Create A Double Exposure In Photoshop
Now that you have selected your images, the next step, albeit a simple one, is to achieve the double effect in Photoshop. You need to separate the object from its target and use a layer mask