KopiKetan BLOG Adobe Photoshop is a powerful photo editing software that lets you create, retouch, and remix your photos.
Hdr Photo Editing In Photoshop – Take advantage of creating beautiful HDR images using plugins with your favorite tools.
We know that trust is built over time. it depends on trusting something or someone for a long time. It is no wonder that Adobe has been able to gain the trust of its many customers with its consistent and reliable services.
Hdr Photo Editing In Photoshop
Photoshop is one of the most popular image editing programs today, and that’s the point. It’s no surprise that Adobe continues to improve its applications further.
Sedona Before And After, Hdr Plus Photoshop And Lightroom.
In the beginning, Adobe applications, especially Photoshop, were very technical and heavy – not as attractive as they are today. Even then, many swore their eternal allegiance to Photoshop. The reason is not far – to trust – products that can always be trusted.
There’s a lot to learn from Adobe’s persistence, but that’s not the focus of this article. Instead, we’ll see how we can get amazing HDR results in Photoshop despite HDR’s limitations.
High dynamic range, or HDR, technology has long been an important part of photographers’ work – especially when shooting wide-angle shots that are not possible with their DSLR cameras.
By taking different pictures with different exposures, combining them with a tonal map (HDR method), the dynamic range of the scene can be shown better – all this is possible in Photoshop; It is one of the many features that have made the app popular among its users.
Affinity Photo Software
The High Dynamic Range (HDR) of an image shows more shades and highlights the details it contains, which are processed and displayed by the HDR application.
For example, it can be a big challenge for you as a photographer to take a good photo with a bright background. This can be a very difficult task as it is impossible to control the highlights and shadow details of the scene with just your camera. The best should give up one for the other.
However, it can be a lot of fun to take different photos in different light intensities and process the photos with an HDR application like Photoshop or Aurora HDR – while reading the highlights, the midtones and shadows.
High Dynamic Range (HDR) technology will dominate, at least for many years. Adobe is well aware of this fact and has loaded their photo applications (Photoshop and Lightroom) with amazing HDR features as well as simple HDR features.
The Ultimate Guide To Hdr Portraits + 3 Free Lightroom Presets!
It’s no wonder that Photoshop is popular among photographers and illustrators around the world and has an amazing collection of tools that have contributed greatly to the world of photography.
Step 2: Open the brackets (Steps 1 and 2 are actually together, but for convenience they are separated). Here you have the option to open your bracketed photos for HDR mixing. You can do it automatically later.
Step 4: Align the image (optional). If the images were not taken with a tripod, you may need to adjust them to ensure image consistency. To adapt, just check the “Adapt image source” box.
Step 5. Click “OK” to continue. Photoshop helps combine images into HDR files. You may be asked for basic camera information.
Photoshop Tutorial: Remove Halos In Hdr Photographs
Step 6. Go through the preview. Here you can remove or add unwanted or desired images as the case may be. This gives you the ability to adjust the under or over exposure of your HDR photos.
It is recommended to save in 32-bit format – which is the easiest file format available in Photoshop’s Bit drop-down menu. If you select a lower bitrate, such as 16 or 8, and click OK, Photoshop will automatically color map the HDR image. You can also use the “Save As” option to choose the image format you want, eg. B. TIFF, PSD or JPEG.
Start Photoshop → Select a file → Select “Automate” → Click “Merge with HDR Pro” → “Select files in the folder” → “Browse” → Click image files → Click “OK” → Select Options/more options update → Save finished. picture.
In addition to the compatibility of Adobe, especially achieved with Photoshop, compatibility with third-party applications is still one of the biggest secrets of the designer.
How To Create Vertical Panoramas With Drones
Photoshop allows you to install plugins or edit images directly within these third-party applications without leaving the Photoshop environment.
You can download a set of Photoshop HDR effects that add depth to your photos with a dynamic range of colors in just a few clicks, without having to adjust all the colors.
There are many free and paid HDR plugins for Photoshop available today. Third-party tools are common to all software applications and vary in their features and capabilities. They also differ in their reliability – while some of them are stable and reliable, others have cars and have accidents or problems in their work.
Choosing the right HDR Photoshop plugin for your workflow can change your experience in ways you never imagined. Aurora HDR helps users create high-quality HDR images in a fun way. It gives you unlimited opportunities to showcase your amazing photography talents.
Photoshop And Exposure Bracketing New Feature For Hdr
Aurora is the first in the world. The #1 HDR app for Mac and PC. Very clear, easy to use and powerful! You will love it from the beginning.
Apart from the fact that AURORA HDR has all the features and functionality you would want in an HDR application, you can decide how you want to use it – either as a standalone application or as a plugin. Photoshop. It also works well with other host applications such as Lightroom, Photos for Mac and more.
Besides the fact that using Aurora HDR as a Photoshop HDR plugin will change your experience, it is essential to help you create the most amazing and impressive works!
July 23, 2023 How to make closed eyes in photos? Have you ever taken a great photo, only to find yourself in the photo with your eyes closed? Here are some ways to help you solve the problem and enjoy the perfect picture. Learn more
Advanced Photoshop Landscape Editing Workflow
August 23, 2023 How to take product photos for sale In the world of eCommerce, the phrase “A picture is worth a thousand words” couldn’t be more true. Attractive product images can make a big difference in convincing a potential customer to click the “Buy Now” button. Learn more
September 11, 2023 How to edit autumn photos to bring out the colors of autumn are knocking on our doors with attractive and exciting beauty. It’s the perfect time to bake cinnamon rolls and read your favorite book in the park on a sunny day surrounded by golden leaves or in a warm blanket indoors when it’s raining. Learn more
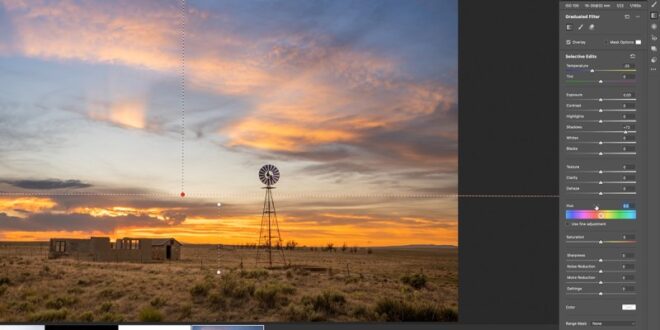
👆 This app is available for desktop only. We’ll send you a link when you return to your computer. HDR (High Dynamic Range) images are a godsend for publishing workflows and have saved my ass more than once. They allow exposure compensation so that image details are not lost and even reveal other details hidden in the shadows. Plugins like ArionFX are great for adding these images to text, but Photoshop’s built-in Camera Raw filter works just as well.
Camera Raw is the default interface that Photoshop displays when you open a RAW file shot on a digital camera. With this tool, you can make basic adjustments to brightness, shadows, contrast, saturation, etc.
How To Create An Hdr Effect In Photoshop — Simple Steps
Other features of the image. The official Adobe Camera Raw tutorial explains exactly how this tool works. It is mainly used for graphics-based applications, but it also proves to be an important tool in 3D rendering applications. Think you can work!
. Camera Raw isn’t a standard tool for editing HDR photos — at least not by default — so you’ll need to change some settings to make it work. Basically, the Camera Raw tool can be launched by going to Filter > Camera Filters or by pressing Shift + Ctrl + A on your keyboard. This option is grayed out when opening a 32-bit image.
This is a known issue since Camera Raw 9.10 and Photoshop CC 2017. I believe it doesn’t work by default in Photoshop 2015 either. Not sure about the old version. Fortunately, there are some serious solutions for using Camera Raw tools on 32-bit images.
The only problem is that you can’t start Raw Camera directly and you have to start combining the 32-bit image into a 16-bit or 8-bit image. The Camera Raw dialog box will appear during conversion after you complete the following steps:
Photoshop Editing Skills Every Photographer Should Know
With this option, you can start the Camera Raw tool when combining 32-bit images with 16-bit or 8-bit sizes.
After turning on the Use Adobe Camera Raw option, Camera Raw appears when you use the Image > Mode > 16/8 Bit command.
Photoshop only allows you to use a limited number of resources when working with 32-bit images. Lots of layer editing and selection tools