KopiKetan BLOG Adobe Photoshop is a powerful photo editing software that lets you create, retouch, and remix your photos.
Digital Painting Skin Tones In Photoshop – The recommender wrote; Skin Color + Swatches by * DeviantNep is an amazing resource that can help many artists by helping them learn how to work with different color tones under the guidance of swatches. I like to think of them as a digital artist’s best friend.
This time I decided to update it and call it epic edition because I kept all the other samples I made when I painted the skin and added them here, along with the highlights I saved.
Digital Painting Skin Tones In Photoshop
~ Cormrael, my soul mate (calling him just my husband seems silly) always says he is amazed at how others can make art using what I make. Because he always tells me that I have decided that it is time to make it even better.
Basic Mistakes In Digital Painting And How To Fix Them
In 2008 I got a daily discount for this, it made my day, I was so happy! Featured it on my blog and art class blog. It also made me want to improve it even more.
The preview model (made with my template) is Faradriel, my World of Warcraft character. I painted him so I decided to use him as a preview pattern model since he was the last pattern I made that was included in the epic edition. You can see Cal Dellard’s work here, an artwork featuring her face. You can also see her game screenshots here. Her face is my face because I didn’t know how to start drawing her, I just took a mirror and put it on the side of the monitor and used my face.
Each vertical row is a full color bar for a skin tone or a full set of skin tones
Each horizontal row is a set of skin-lightening shades (died to lighten and darken fair skin in different compositions)
How To Paint A Celtic Female Portrait
Light colors at the beginning of each row and shadows at the end of each row (light to dark composition)
The sample file has colored bars separated by yellow and turns green when they end and highlights begin
If you use Gimp, ~ Neoniov made a Gimp version of the old version of my model, click here to see.
The new swatches are made in photoshop x5 so I don’t think it will work on older versions but so you have a swatch pattern to choose the color while drawing
Digital Painting: Eyes, Mouth, Hair, Skin Tones
For those who don’t have Photoshop or have an old version of it, use the sample template. Open your program of choice (Corel, etc.), open the swatch pattern image and select the pattern color as you paint…
Please give me credit (thanks) and please show me what you do with my patterns (I love it when people show me what they have made with my pattern!!!)
PS: If any of you make this model for an older version of Photoshop (with color picker) or another program like Gimp, Paint Shop Pro, Corel, etc.
Please email [email protected] (my email address) and send me the name of the file and the program it is for (along with the version) so I can add it to the zip archive and link you to it. Also add an update to my artist comments.
Skin Free Brushes
And now for fun! * Bampir made a seal for you to use (if you want). I thank Bampir! I think I have to say about the skin because I have a lot of questions about it. Here’s a list of tricks to make your skin more “realistic” using the computer…
Avoid simple slopes. You can’t get convincing skin if you just add black and white to your base skin tone. It is more complicated.
Just work with low opacity (0-5%), on a separate layer and a soft round brush.
By the way, if the contrast is bad, it won’t work. Contrast is more important than color.
How To Make A Realistic Digital Painting In Adobe Photoshop
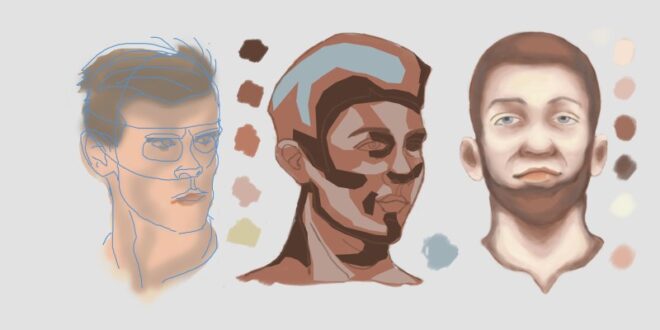
For black skin, I never find a good and only way. It really depends on the skin tone. Since black leather generally reflects light well, light has a large effect on tone.
Don’t forget the environment and direct lighting that can change your skin tone. Shadows are very dark in bright light, and for example, the contrast of your image should be high.
You can easily adjust the contrast/tone/brightness of individual parts of the image with your favorite software. This is not the best way to work, but it can be useful sometimes.
I use a “dry brush” to create skin textures. It works pretty well if you use it carefully. Again, try to work with a very low opacity and on a separate layer (so you can also change the opacity of the layer).
Illustrator Swatches And Digital Painting
For fair spots and freckles I use a soft round brush…very small. Working on a high resolution photo is easier…it doesn’t take much time and you don’t have to be very precise. Basically, to paint leather, you need to know where and how the light comes from, which accordingly creates shadows, which, together with the quality and color of the leather, is all you need to paint the leather. If you want to add texture to it, that’s easy. There are endless brushes that have this feature, but even though they have this feature, they won’t paint for you, you have to do it based on your own knowledge. To do this, you need to know the basics. You can’t start running before you can even walk.
I hope this tutorial will explain more about this realistic technique and not be too long and boring. Let’s begin.
(Hmm! Sorry if this is too long. This tutorial is like telling you to emphasize the most important thing, but everything is important.)
Light and shadows give volume to the image, in the image, drawing the skin, we create volumes that make the body, because it is important to know the basics.
Step By Step Digital Painting Tutorial By Qinni On Deviantart
Although light and shadow are also used for flat images, they do not provide much depth, but when it comes to 3D images, it is necessary to give a three-dimensional feeling to a 2D plane by properly applying light and shadow. First of all, it is necessary to make the impression of images passing in reality; We achieve this through the play of shadows and light.
(Visual GIF explanation) Seeing a circle become a sphere in a 2D environment makes me wonder if life is like that, we just don’t notice it because our brain processes the information. Isn’t it so? =͟͟͞͞( ✌ °∀° ) ☛
Light allows us to see contours, textures and colors, in this sense we will have: direct light, reflected light.
Direct light: comes from a light source with its own light energy, such as sunlight, light bulbs, flashlights, etc.
How To Paint Digital, Step By Step, Drawing Guide, By Dawn
Reflected light: Also called indirect light, it is a type of light that comes from a body that has no light of its own, but receives it from another because light reflects it.
When it comes to shadows, remember that they are responsible for giving the image volume. They are divided into: own, reflexive and predictable. Below is a brief description:
Private shade: This means that there is an area where light cannot enter directly, it is a twilight zone and the color is usually darker.
Cast Shadow: This is the shadow that an object casts on the surface where the object is located. The shadow has the characteristics that the far part of the object is diffused, while the near part is dark and solid.
Make Your Characters Pop With Colour And Light
Reflected shadow: This is the shadow cast by an object on another object, that is, they are adjacent to the objects and are caused by reflected light. This is best understood by placing an object of a different color. The light that the secondary object reflects from the primary will be proportional to its color. All objects reflect their own color, including skin (explained below).
In order to shade an image, it is important to know the elements that we need to create. There are two types of lighting for this purpose: natural and artificial. The lights are related to the quality of the leather, which will be explained later.
Natural light: This is the light reflected by the sun or moon. Since the light source is far away, it moves parallel, in a straight line. It is projected onto the object at an angle of 45º and has the same shape and length as the illuminated object.
Artificial light: It is electric light emitted by electric lamps, flashlights, candles or bulbs and propagates in direct and radial direction. The projection on the object is not an angular projection and creates a wider and narrower shape for the object.
Tutorial: Drawing Skin Tones With Colored Pencils
Given the above, we can learn to draw skin already from memory. I will use a bullet to explain this.
First, we need to decide where the light will come from, so we know where the shadow will be, and thus apply the light and shadow structure described above. Then apply the base color.