KopiKetan BLOG Adobe Photoshop is a powerful photo editing software that lets you create, retouch, and remix your photos.
Advanced Photoshop Image Blending – Photoshop is a powerful image editing tool and has many features that can give your photos a little pop. The blend mode determines how smoothly a given layer blends with the layers below it. In this quick tutorial, we’ll show you how to use blend modes and learn what they do in Photoshop.
Blend mode looks at the color information in one layer and tells the pixels how to interact with other layers, graphics, or editing tools. You can use blend mode to create unique effects on your images with a single click of the mouse. There are a total of 27 different combinations available. Photoshop divides them into six small groups for easy navigation. Normal, Dark, Light, Contrast, Contrast and Color. These groups are not listed in the program, but the rules are divided.
Advanced Photoshop Image Blending
To use a blend mode, you must first select the layer you want to affect. You can hover over each mode in the mix drop-down menu to preview how each group will look. Don’t forget to click on the location name in the list to confirm and enter the combination location and voila! In the example above, I used the hue blend mode to affect the color of the layer so that the red apple is now a green apple.
How To Use Blending Modes In Photoshop
Blending styles can be used to give your photos different looks and styles. Mixed styles should be used sparingly, as using several at the same time can create a beautiful look. We often use the blend type as multiplication to create gradients of the same color on the image so that the text stands out and continues to be read in the image. And Luminosity to change the image from full color to monochrome. Each type of combination will react differently depending on the photo and the color used. Experiment and see what works best for you and your work.
If you’d like to continue learning more tech tips specifically for professional Adobe software marketers, subscribe to our blog or follow us on social media.
Josephine holds an Associate’s Degree in Graphic Science/Graphic Design from Middlesex Community College and is currently working on her Bachelor’s Degree from Southern New Hampshire University. She enjoys playing video games, watching movies, drawing, swimming, knitting, crocheting, photography, creating books, and spending time with her two French bulldogs.
We use cookies on our website to provide you with the most relevant experience possible by remembering your preferences and repeat visits. By clicking “Accept” you agree to the use of all cookies. However, you can visit cookie settings and provide controlled consent. Acceptable cookie settings
About Shooting A Focal Length Blend And Blending It In Photoshop
This website uses cookies to improve your browsing experience. Among these cookies, these cookies are classified as necessary to be stored in your browser because they are necessary for the basic functionality of the website. We also use other cookies that help us analyze and understand how you use this website. These cookies will only be stored with your consent. You also have the option to opt out of these cookies. However, disabling some of these cookies may affect your browsing experience.
Necessary cookies are very important for the website to function properly. This group only includes cookies that provide basic functionality and security features of the website. These cookies do not store any personal data.
Analytical cookies are used to understand how visitors interact with the website. These cookies help provide information about metrics, visitor numbers, bounce rates, traffic sources, etc.
Cookies are used to understand and analyze key performance indicators of the website, helping to provide a better user experience to visitors.
Advanced Photoshop Course
Functional cookies help perform certain functions, such as posting website content to social media platforms, collecting feedback, and other functions.
Advertising cookies are used to provide relevant advertising and communications to visitors. These cookies track visitors across the site and collect information to deliver personalized advertising. Many photographers know that layers are one of the most popular and even infamous features of Photoshop. Layers are the foundation of non-destructive editing in Photoshop, and almost all Photoshop workflows involve multiple layers. That’s why it’s important to understand how these layers can be combined using Photoshop’s blend mode.
This article will give you the basics of mixing and show you the most useful types of mixing. If you are new to Photoshop, please read my Adobe Photoshop Beginners article before continuing with this article.
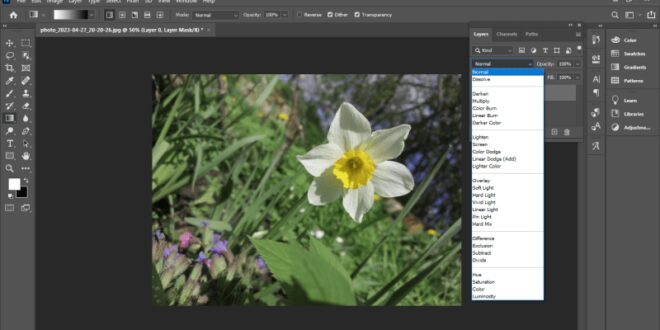
Blending mode in Photoshop is an option on the “Layer” tab. They determine how a given layer is connected to the layer below it. Check out the images below:
Solved: Blending White Backgrounds
As you can see in the image above, Photoshop has a total of 27 blending modes and 6 groups. Band names give you an idea of what they do. Although there are 27 in total, most of us find only a few useful in most situations. There are quite a few combinations that I haven’t used or seen anyone use, and this article only covers about a dozen that I found useful.
Before we get into blending mode, you should understand two other tools in Photoshop’s Layers panel: Opacity and Fill. Check out the images below:
I have three images stacked on top of each other. The opacity of each layer can be changed using the opacity drop-down menu (red line in the image above).
The differences between the three editions are clear. The middle one is 100% opaque – in other words, it blocks everything in the layers below it. The image on the left has 50% opacity, which means it’s transparent. Shows both the selected layer and the overlay below. Compare the one on the left and the one on the right. Layer 20% shows 80% of the background and 20% of the selected layer.
Using Layer Blending Modes Of Adobe Photoshop Elements To Control Contrast || Overlay Blending Mode
Opacity is often used in photography to reduce the effect of a single layer. The image above explains how opacity works in theory. Now let me show you how it can be used in a useful way. Check out the images below:
As you can see, I used a simple curves adjustment layer to improve the contrast. But you will notice that the feeling seems exaggerated. Sometimes it is difficult to make the right changes using the conversion tool itself. In such cases, the coverage slider comes to the rescue. All I have to do to reduce the intensity of this adjustment is to lower the opacity of the layer. The image below shows the result where I reduced the layer opacity to 42%.
For a long time I was one of those people who never noticed the difference between opacity and fill (another drop down option below opacity). I have seen many times that both opacity and fill give the same result. If both opacity and density do the same thing, what’s the point of having two options? That was the question that puzzled me for a while. I didn’t realize the difference until I learned about Photoshop’s “special blend mode”.
Earlier in this article, we saw that Photoshop has 27 blend modes, of which Photoshop has 8 unique blend modes: Light Color, Linear Burn, Color Fade, Linear Fade, Vivid Light, Linear Light, Hard Blend, and Difference. These are just eight styles where opacity and fill work differently. For others, both give the same results.
Blend Graphics & Photos Advanced Photoshop No. 95 + Loaded Cd! Master Pro Tech!
Let me explain the above with an example to better understand the difference between the two. Check out the first image below:
Let’s say I want to give the mountains and grass an orange tint. To this I can add a layer above the image that is all orange (255, 163, 63 to be exact). I can choose the light color as the blend mode. The resulting image is shown below:
It’s amazing, isn’t it? To handle this, let me reduce the opacity to 25% as shown below:
This image is much better, but has a sepia feel to it rather than the light tone I’m really looking for. For the image below, I reduced the density to 25% instead of opacity:
How To Use Blend If In Photoshop
The one above looks more natural. The difference between Opacity and Fill is clear; These two types of light work are completely different.
Specifically, lowering the opacity reduces the transparency of the layer on all surfaces. Fill, on the other hand, affects different parts of different images. Specifically, everything depends on the “effect” of the chosen type of combination, for example, Color Burn darkens the image.